Post by Wickedtoyz on Jun 27, 2011 10:47:29 GMT -5
Back in 2002 I had owned a Te72 corolla sr5 3tc equiped 5spd(t50)
my ignition went bad and i couldn't afford to get a new one. so i looked into a better(cheaper) ignition. what i found was that ford had an ignition like msd that put out a great deal of power to help my rolla burn the fuel better and allow me to run the accel superstack coil.
Wiring The Duraspark II
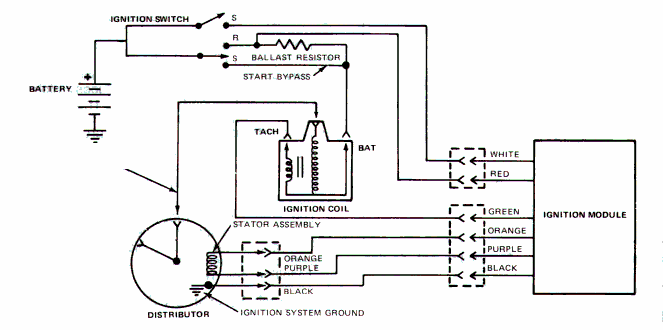
This ignition system is a popular swap into earlier cars and trucks. Wiring it up is quite straightforward. This is most easily accomplished by making a trip to your favorite junkyard and rounding up all the parts. Be sure to get the wiring harnesses connecting the module, distributor, and coil, as well as the male end of the 2-pin connector and some length of its wires. Note that the colors of the wires shown in the diagram below are at the module itself. The wires in the harness tend to be different colors on different cars and years.
Power is supplied to the BATT or + coil terminal in the same fashion as the older breaker point ignition. Under normal "run" conditions, power comes from the key switch through a length of resistance wire (0.8 to 1.6 ohms). This wire is normally pink and is found under the dash. During cranking, this resistance is bypassed by a wire from the "I" terminal on the starter relay. In most applications, the wire that used to power the coil can power the new coil.
The system is grounded through the black wire in the harness to a point inside the distributor.
Only one new connection is required. The module receives its power through the red wire in the 2-pin connector. This must come from the key switch terminal that is "hot in start or run". If your car has an idle positioner solenoid, the wire powering that may be used to power the module.
Optionally, but a good idea, the white wire in the 2-pin connector is connected to the "S" terminal on the starter relay. This is used as a cranking indicator to the module, to retard the timing slightly to ease the load on the starter motor.
Use the factory harness for the rest of the wires. The green wire runs from the module to the TACH or minus coil terminal. This is where you can connect a normal tachometer. The orange and purple wires from the module run to the pickup inside the distributor.
Additional Notes On Conversions:
Retrofitting the Duraspark II system to earlier small block V-8 cars is a popular swap. A few things should be considered when selecting the parts:
Distributors do not physically interchange between a 302 and 351W. 351W engines have a larger oil pump driveshaft. The end of the distributor shaft is also larger to accommodate this difference. The 289/302 distributor shaft diameter is 0.467", 351W is 0.531". At the junkyard, small blocks tend to all look alike. Be sure to go to the junkyard armed with a 1/2" distributor wrench. On cars loaded with power steering and air conditioning it can be quite a challenge to remove the distributor hold-down bolt without the proper tools.
Also be sure to use the correct distributor drive gear. The material must be compatible with the camshaft. Most normal cast iron camshafts require a cast iron distributor gear. Hydraulic roller camshafts are generally steel, and require a steel gear. Some aftermarket camshaft manufacturers specify the use of a bronze gear. Gears in all combinations of size and material are available from Ford Motorsport.
When installing the new distributor, it is always a good idea to use a new O-ring.
The control module doesn't like to get overheated. Be sure to mount it somewhere away from heat sources. (if such a place exists under a hood)
{{taken from
below is some info on how to wire this up to your rolla. anyquestion i can try to answer but it will take me time.


webpages.charter.net/1bad6t/duraspark.html
my ignition went bad and i couldn't afford to get a new one. so i looked into a better(cheaper) ignition. what i found was that ford had an ignition like msd that put out a great deal of power to help my rolla burn the fuel better and allow me to run the accel superstack coil.
Wiring The Duraspark II
This ignition system is a popular swap into earlier cars and trucks. Wiring it up is quite straightforward. This is most easily accomplished by making a trip to your favorite junkyard and rounding up all the parts. Be sure to get the wiring harnesses connecting the module, distributor, and coil, as well as the male end of the 2-pin connector and some length of its wires. Note that the colors of the wires shown in the diagram below are at the module itself. The wires in the harness tend to be different colors on different cars and years.
Power is supplied to the BATT or + coil terminal in the same fashion as the older breaker point ignition. Under normal "run" conditions, power comes from the key switch through a length of resistance wire (0.8 to 1.6 ohms). This wire is normally pink and is found under the dash. During cranking, this resistance is bypassed by a wire from the "I" terminal on the starter relay. In most applications, the wire that used to power the coil can power the new coil.
The system is grounded through the black wire in the harness to a point inside the distributor.
Only one new connection is required. The module receives its power through the red wire in the 2-pin connector. This must come from the key switch terminal that is "hot in start or run". If your car has an idle positioner solenoid, the wire powering that may be used to power the module.
Optionally, but a good idea, the white wire in the 2-pin connector is connected to the "S" terminal on the starter relay. This is used as a cranking indicator to the module, to retard the timing slightly to ease the load on the starter motor.
Use the factory harness for the rest of the wires. The green wire runs from the module to the TACH or minus coil terminal. This is where you can connect a normal tachometer. The orange and purple wires from the module run to the pickup inside the distributor.
Additional Notes On Conversions:
Retrofitting the Duraspark II system to earlier small block V-8 cars is a popular swap. A few things should be considered when selecting the parts:
Distributors do not physically interchange between a 302 and 351W. 351W engines have a larger oil pump driveshaft. The end of the distributor shaft is also larger to accommodate this difference. The 289/302 distributor shaft diameter is 0.467", 351W is 0.531". At the junkyard, small blocks tend to all look alike. Be sure to go to the junkyard armed with a 1/2" distributor wrench. On cars loaded with power steering and air conditioning it can be quite a challenge to remove the distributor hold-down bolt without the proper tools.
Also be sure to use the correct distributor drive gear. The material must be compatible with the camshaft. Most normal cast iron camshafts require a cast iron distributor gear. Hydraulic roller camshafts are generally steel, and require a steel gear. Some aftermarket camshaft manufacturers specify the use of a bronze gear. Gears in all combinations of size and material are available from Ford Motorsport.
When installing the new distributor, it is always a good idea to use a new O-ring.
The control module doesn't like to get overheated. Be sure to mount it somewhere away from heat sources. (if such a place exists under a hood)
{{taken from
below is some info on how to wire this up to your rolla. anyquestion i can try to answer but it will take me time.


webpages.charter.net/1bad6t/duraspark.html


 Aww man, at least you tried. What are you planning to try next?
