DIY Custom IS300 LED Tail Lights
Sept 14, 2014 20:38:21 GMT -5
Rinconrolla and kennydang91 like this
Post by gold94corolla on Sept 14, 2014 20:38:21 GMT -5
So after I smashed my OEM tails against a wall, I picked up these LED tail lights from Taiwan. They are the only lights I can stand on this car anymore, the stock ones are dated and riced out, and it never looked right to simply red out the upper part of the stock lights. I liked these because the inside reflectors replaced the circular brake lights with a design that matches the shape of the tail light, so it looked proper behind a red lens.
 New LED Tail Lights by gold94corolla, on Flickr
After I installed them (no issues with fitment), I fired them up, only to notice that the LEDs inside were all very unevenly lit. The inner columns are brighter than the outer columns, and the right tail light was noticeably brighter than the other.
 LEDs Aren't Evenly Bright by gold94corolla, on Flickr
After I installed the matching trunk LEDs, I noticed how dim the outer tail lights were in brake-mode. They're OK brightness, but definitely not up to my brightness standards. I'm pretty anal about my lights, so they have to match lol. Plus, it can't hurt to have brighter brake lights.... the brighter the better!
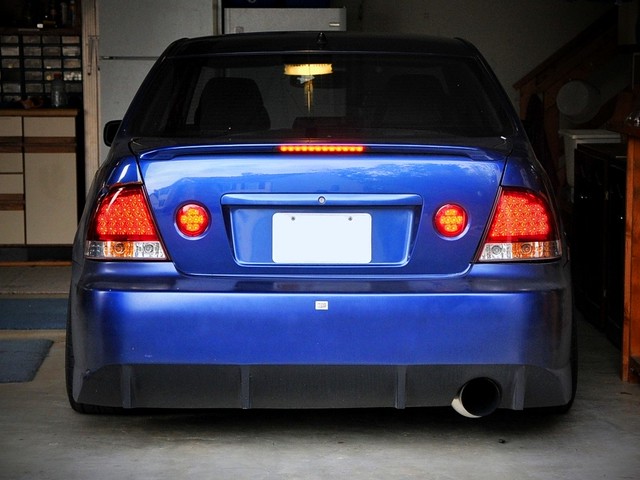 LED Tails Brake Lights by gold94corolla, on Flickr
So, I knew that opening the tails to customize them and fix these problems was inevitable (especially in "light" of my history of lighting addiction). I thought it would be cool to change how they lit up, to something maybe more unique and modern. Here's a photoshop I did on this car with the same tail lights (the brake lights were all on, so I blacked out all 5 tail lights to just this):
 LED Tail Light Concept by gold94corolla, on Flickr
My idea was to create a bright LED strip in that shape^^^^ to function in addition to the other LEDs inside. This extra strip would be a kind of rear fog light, or rear DRL... something brighter than the parking lights that I could use when needed. Maybe the extra strip light could also be programmed to function as the parking light as well, in a dimmer mode, instead of having ALL the LEDs on (so it would look like that ^^^^ at night also).
My original intention was to rip out the LED reflectors completely and build my own LED board, maybe with some kind of optics or diffuser to hide the LEDs and help distinguish the outer LED strip from the inner LED brake lights.
Over a couple of years, I kept thinking about how I would be able to achieve this. I even picked up some acrylic sheets locally to experiment with diffusion techniques. I later abandoned the idea of removing all of the reflectors, because I really liked how they looked in there, all shiny and reflective and stuff.
Then, I read about some new flexible LED light tubes that could possibly work. By now, I'm sure you've seen people install the switchback (yellow + white) version of these inside of head lights.
exLED 1 Color or 2 Color LED Bar Ver2
I ordered a few feet of those in red-red (two red strips inside, not 2 different colors). They eventually arrived from Korea, in some of the most overkill packaging EVER lol (the box itself was wrapped inside of all that bubble wrap you see behind it):
 exLED Strip Box by gold94corolla, on Flickr
All of that ^^^^ for this:
 exLED Strip Materials by gold94corolla, on Flickr
The red LED strips have side-firing LEDs, and are flexible in one direction. They were really bright when I first fired them up:
 exLED Strip LEDs Lit by gold94corolla, on Flickr
But then, as soon as I put them into the conduit tubing, the light was drastically reduced, and spread the light output in all directions (including backwards), cutting down on the forward intensity too much.
 exLED Strip Comparison by gold94corolla, on Flickr
In this pic, it LOOKS like the strips are bright, telling by all of the red "glare" around the strips, but that's not actually glare like 2 pics up, it's actually just light coming out of the side and bottom of the tubes. So they were very dim inside the tubes.
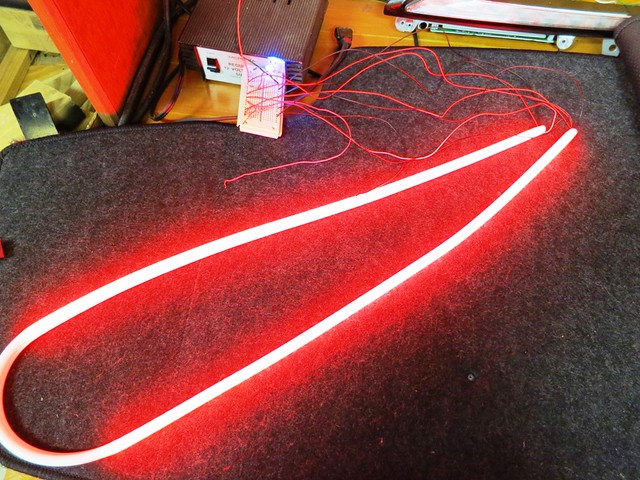 exLED Strip Final by gold94corolla, on Flickr
Some closeups of the LED strips and tube:
 exLED Side by gold94corolla, on Flickr
 exLED Length by gold94corolla, on Flickr
 exLED Top by gold94corolla, on Flickr
 exLED Tube CrossSection by gold94corolla, on Flickr
(a lot of time elapses)
I took the tail lights off the car finally for other reasons, and decided to just start the project.
The stock tail lights are plastic-welded shut, but these had glue holding on the lens. I hoped it was regular glue that could soften by heating, but alas, it was permaseal. Nevertheless, I was somehow able to get the lenses off with the lucky combination of time and temperature in the oven. The LED section itself then removes with 3 screws on the back. I cut off the sockets for later, and removed the red reflector rectangles. I ended up chipping a part off of each lens, so technically I ruined them and failed. I ordered a new set of tails lol.
 Tail Lights Opened by gold94corolla, on Flickr
Next, I taped up the individual reflectors (for the LEDs, turn signal, and reverse lights) and sprayed them with my trusty Rustoleum flat black automotive primer (same paint as the head lights). I use this color because it's a very light black, almost gray, and it is a perfect match for carbon fiber and tires (all my blacks gotta match lol).
 Tail Lights Painted by gold94corolla, on Flickr
Tape removed.... came out perfect
 Tape Removed by gold94corolla, on Flickr
Here's a comparison showing the effect of the paint after the replacement set of tail lights came in. The paint doesn't really do that much, but just darkens the tails just enough to have a unique look, not chrome anymore, but not black, either.
 Tail Light Comparison 1 by gold94corolla, on Flickr
In the shade, the difference becomes obvious. (note that the red reflector rectangles are not installed back in the black tails yet)
 Tail Light Comparison 2 by gold94corolla, on Flickr
I figured that I knew what I was doing, and that to remove the tail light lenses without chipping, they needed more temperature and/or time in the oven. Well........... I was wrong. As soon as I removed them, and they started to cool, the lenses warped badly, completely ruining them.
So I was instantly ready to give up, since there was no way I was going to risk ruining a set of these beautiful tail lights. I took out my frustration in the only logical way.
 Tail Light Project Aborted by gold94corolla, on Flickr
I went back and ordered a 3rd set of tails, and that was going to be that. But I quickly realized that I might be able to repair the lenses, so I superglued the chipped parts back on. It worked perfectly on one tail light, but I screwed up on the other, making the seam look cloudy white. Since it was in the red section, I couldn't have that, so I ordered a can of red lens paint from VHT. I figured I could just paint over the entire red section and it would look good again. (note, I never did repaint it lol, figured I'd just make it worse). Fortunately, I was able to cancel the order of tail lights, the seller was very nice.
So after letting the project sit for a little bit, I was doing other work on the car. I was learning how to wetsand and do machine polishing while learning how to get OEM paint finish with spray cans and clear coat. I decided to have a go at the tail light lenses with the polisher machine. The difference was instantly noticeable:
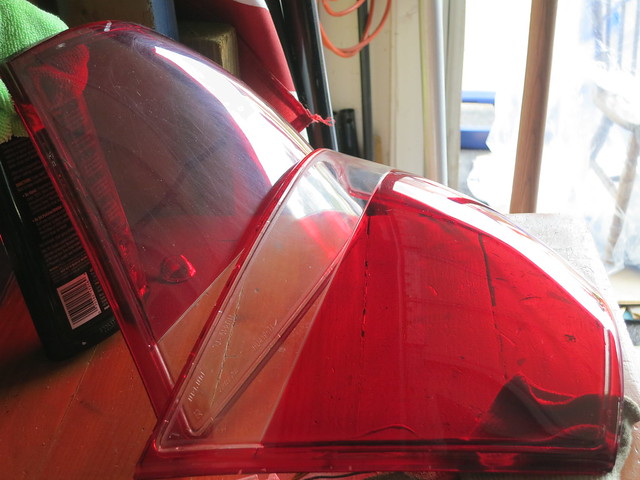 Right Lens Buffed by gold94corolla, on Flickr
 Top Lens Buffed by gold94corolla, on Flickr
Looked new again!! So, inspired by that, I went back to work on the tails.
I played around with the LED strips in order to determine how to install them and get the look I wanted. Played around for hours and days lol.
I ultimately came up with this simple setup (simple was the goal here, didn't need it breaking or something later).
In the pic below, the green circles are little holes I drilled to feed in the LED strips. The two holes on the left side are where the strips enter (the wires go out there), and the one hole in the bottom on the right is where the other end sticks in, just to hold it in place.
The red square shows how I had to put heat-shrink wrap around the last 2 LEDs on the strip in order to hide them from view when they lit up. You see, these strips light up in segments of 3 consecutive LEDs, and I needed exactly 1 LED in this last segment in order to complete the line. So, I left the other 2 LEDs on out of necessity, but it ended up to my advantage, because that gave the strip some extra length to go through the hole and hold itself in place. The black heat-shrink wrap would blend in with the black paint and disappear.
 LED Strip Installation by gold94corolla, on Flickr
Next was to glue the strips in place. You can see the product I used in the pic: RTV ultra black gasket maker. It takes 24 hours to cure, so I put the clips on to hold it for that long.
The bottom strip was pretty straightforward to glue in, but actually, in order for it to end up at that bottom hole I drilled, I had to file down each edge of the chrome LED reflectors behind it. The bottom LED strip cannot flex backwards, so it had to remain straight along there. Filing down the reflectors under the strip meant that it could sit flat and straight, perfectly.
The upper LED strip just happened to naturally follow the perfect shape I needed. You can see how it touches at the top, then rounds towards the bottom, then sticks through that hole, and touches the bottom of the black painted reflector area.
Oh, and another thing.... it took me a while of playing around to figure out how to get the LEDs to appear seemless from one strip to the other. I had to pay special attention to where I glued in the bottom strip. If I glued it too close or too far, the first LED on the bottom strip would appear out of place compared to the last LED on the upper strip.
 LEDs Glued In Place by gold94corolla, on Flickr
24 hours later, I removed the clips. Everything was perfectly glued in place! I couldn't help but fire up the strips to see how it would look. Notice that, as I just mentioned, the LED spacing appears consistent all the way around, even where the 2 strips come together. Also notice how it would have not looked right if the upper strip had one less LED, instead of covering up the last 2 to get that extra 1. Both tail lights look identical to each other!
 LED Strips From Front by gold94corolla, on Flickr
 LED Strips From Far by gold94corolla, on Flickr
The side angle here shows..... well, a side angle. You can see how the LED strips kinda float in front of the reflectors as they curve down.
 LED Strips From Side by gold94corolla, on Flickr
And from the top.... it took a lot of time getting the strips to match perfectly in both tail lights.
 LED Strips From Top by gold94corolla, on Flickr
And the cool thing is that you really can't see the strips in there, even though they sort of cover the outer reflectors. And the bottom strip is glued right on the edge between chrome and black paint. So they blend in very nicely.
 Just LEDs by gold94corolla, on Flickr
Again. I've obviously put the lower red reflector rectangles back in (that will help brighten up that area so it doesn't look so black in the final product).
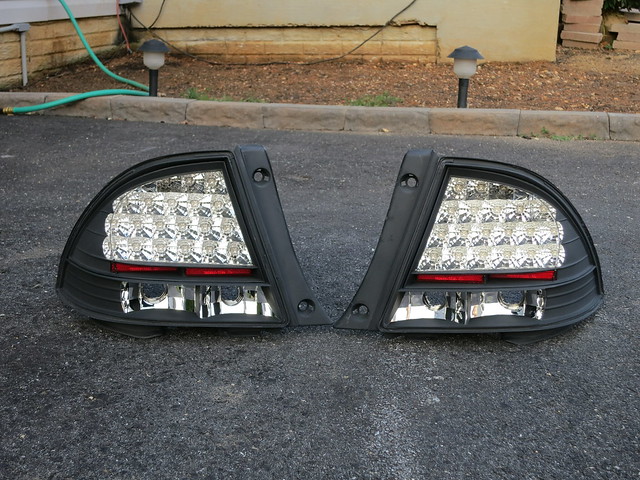 Tail Lights Without Lens by gold94corolla, on Flickr
Annnnnnnd with the lenses back on. You can see how the lower reflectors help fill the dark space down there (which I didn't like when I first painted the lights)
 Final Tail Light Look by gold94corolla, on Flickr
I couldn't help myself... just had to see how the strips would look
 LED Strips Inside Lens by gold94corolla, on Flickr
This next pic shows the brake lights on with the old inner LEDs, a pretty good match for the strips. The strip LEDs are actually redder than the old brake lights. Also, the strip helps fill in that one dead area on the top left where there is no brake LED.
 Strips + Old Brake LEDs by gold94corolla, on Flickr
Next was to redo the LEDs inside of the reflectors. I needed 20 LEDs per side. I ended up buying 1200 lol.
 LumiLEDs For Sale by gold94corolla, on Flickr
Those are the ideal LEDs for OEM setups, and what I've always used in my builds. You can see the specs on the label if you view the fullsize pic (4000x3000) on Flickr.
It was really easy to remove the old LEDs with some small screws.
 LED Boards Unscrewed by gold94corolla, on Flickr
Again, viewing these pics in full size will bring out the details, if you're interested.
The old LED boards were set up so that there were 2 LEDs and one resistor in each little circuit on the inner 4 columns, and 3 LEDs + 1 resistor on the outer 2 columns. I never was able to figure out why they were all different brightnesses, but I have a feeling this difference has something to do with it.
Also, the tail lights combined brake (bright) and parking (dim) functions together with the same LEDs using a simple resistor and 2 diodes on each + input. You can see the resistor where the green wire connects to the board.
I was gonna change ALL of that.... because it sucked. So, bye bye old components!!
 Old Components Removed by gold94corolla, on Flickr
My first change was that I was going to have FOUR LEDs + 1 resistor per circuit. Since there are 20 LEDs, that would make 5 little circuits, instead of NINE before. Since each circuit uses the same amount of power, fewer circuits means less power consumption.
Here's why:
If you have 12 volts, and each LED takes 2.6 volts, then you need a resistor to make up the difference in volts. So, if you have 2 LEDs, the resistor needs to consume 6.8 volts. But with using 4 LEDs per circuit, the resistor only needs to consume 1.6 volts. Resistors are just converting power into heat... a complete waste. So you can see how my proposed setup will save power.
I know that ^^^ is way over simplified and not entirely correct, but stop thinking so hard and trust me!
um where was I
Oh yeah, the new boards. So I soldered on 20 new LEDs and reconfigured the boards so that I could have 4 LEDs per circuit instead of 2.
 Replaced LEDs Rear by gold94corolla, on Flickr
You can see that I had to add some jumper wires to convert the boards as needed. The resistors are installed as well, though not as many as before. View the big picture and figure it out if you really care lol. (note that the boards have built-in traces or wires, so I utilized those as well, and had to break some connections)
From the front, it doesn't look any different than before, but now the LEDs are much better quality and designed to run properly!!
 Replaced LEDs Front by gold94corolla, on Flickr
Note that I've put the connector plug back on directly to the board, and the green wire is not connected. That's because I was going to change the wiring on the tail light harnesses in the car itself, and BOTH parking and brake feeds were going to come through the red wire into these 20 LEDs, rather than combining on the board with resistors and diodes. More on that later. I did this so that I'd have the green wire freed up for the LED strips.
Here's a quick comparison showing how the new LEDs on the right are a lot brighter (and redder!) than the old ones on the left.
 Old LEDs Vs New by gold94corolla, on Flickr
Hmmm, seems like I'm missing a picture here of the LED boards installed back into the reflectors and with the LED strips wired into the harness. Oh well, you have an imagination.
With the LED part all finished and functioning properly, it was time to reseal the lights!
You can see the glue I used: Clear RTV silicone. Again, a 24 hour cure time, so I used tape to hold the lenses tightly in.
 Tail Lights Glued by gold94corolla, on Flickr
I removed the tape a couple of days later... FINALLY FINISHED!!! Oh, and I spray painted the black bolt area gloss black again, since I forgot to mask it off when painting it with black primer.
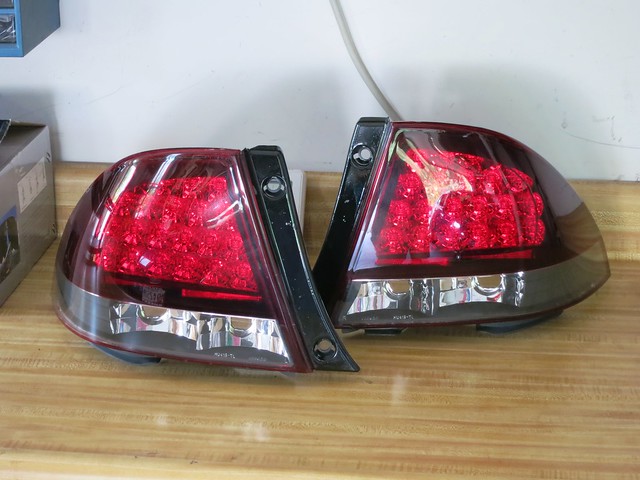 Completed LED Tail Lights by gold94corolla, on Flickr
Well I wasn't really finished, was I. I said earlier that I was going to re-wire the car to combine the brake and parking light together into one wire.
Here's what I used. Instead of doing the simply diode+resistor thing, I used a pulse wave modulator (PWM). I happened to have 2, but I only needed one. Each of these can handle 2 amps of current, but my tails use only 0.7 amps COMBINED. That's 8.4 watts for both sides, vs 42 watts with 2 OEM bulbs.
ANYWAYS, here's the boards. You can see it has 4 wires on the bottom. They are marked (thank goodness). B = Brake input, M = Marker input, - = ground, and O = Output to the tail lights. You can see the 2 large diodes on the board... just like the two diodes that used to be inside the tail lights with the LEDs. The blue knob thing on that top controls the brightess of the output in marker mode. I had to set it as dim as it would go to match the marker brightness on the trunk lights perfectly. I did install a heat sink on the voltage regulator (the black thing in the center with 4 pins) later. The little white LED there just shows what the output looks like.
After this thing is wired up, it will light up the output dim by flickering really fast at full power. There is no resistor. The LEDs are always full brightness, but depending on how it flickers, it looks brighter or dimmer. You can Google PWM if you're interested in more. And when the brake light input is triggered, it stops flickering and you get it looking full brightness again. Pretty neat, and it's the proper way of dimming LEDs. Maybe you've seen other OEM cars with LED tails at night, and you'll maybe be able to see the super fast flickering. Well, that's what this is. The voltage regulator is there to limit the voltage to the LEDs to 12 volts. Without this, the LEDs can see ANY voltage that is sent their way, usually up to 14. Having no regulation (like before my project), LEDs fail.
 PWM Detail by gold94corolla, on Flickr
Again, you can Google all of this stuff because I'm the worst at explaining these things. And if I could learn how to do this, so can you.
In the car, I was pretty lucky with the stock wiring. 1) it was easy to access, right where you'd think it would be, and 2), it was just tail light wires inside of the looms, nothing else. So, that meant that I could work with both sides in one spot where they came together.
I opened up the looms and found the parking light and brake light wires. Cut them. The brake input wires and parking input wires went to the PWM board, and then the PWM output went to the tail lights. Those are all with yellow wire nuts. The orange wire nut is a new red wire I ran from the front of the car for the LED strips, and so that red wire connects to the green wire in the tail lights. Oh, and the ground wire goes to that bolt there. You can see the white LED lit up to show it works, and you can see that I've installed a heat sink on the voltage regulator.
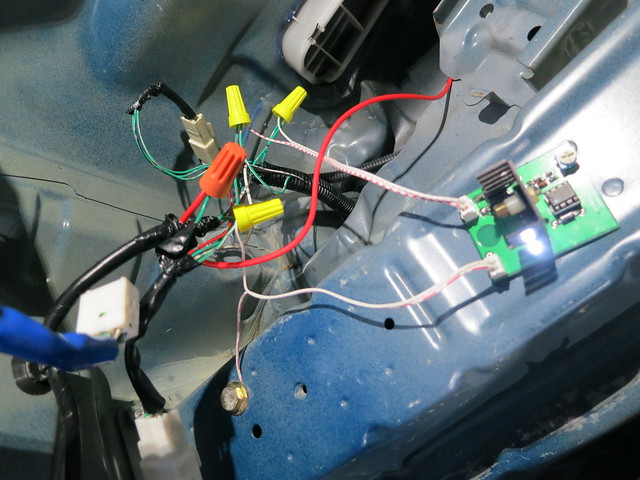 PWM Installed by gold94corolla, on Flickr
After stocking up the wiring and tucking the PWM away:
 stocked Finished Wiring by gold94corolla, on Flickr
BTW, the carpet covers all of the wiring, so there wasn't a point in taking a pic of the final wiring job.
Tail lights simply plug in, just like before, but now they function properly! Of course, I won't be able to use stock tail lights or regular bulbs unless I simply undo that wiring (that's the benefit to using wire nuts, it's temporary)
Thought you were getting final installed pics? NOPE!! STILLLLLLLLLLLL not finished yet! One more thing to do: power the strip LEDs.
Originally, I was thinking of using an OEM rear fog light switch installed in the blanks area. But then I found this place with a whole ton of custom rocker switches:
OTRATTW
My original front DRL switch had fried anyway, so I went ahead and ordered two rockers, one for the front and one for the back.
When the switches arrived, I tried fitting them in the OEM blank spots. They didn't quite fit, so I had to widen the holes in the dash (there was extra plastic there for some reason), and I had to trim the bottom of the switch slightly. You can see that all, plus the old junk, in this pic.
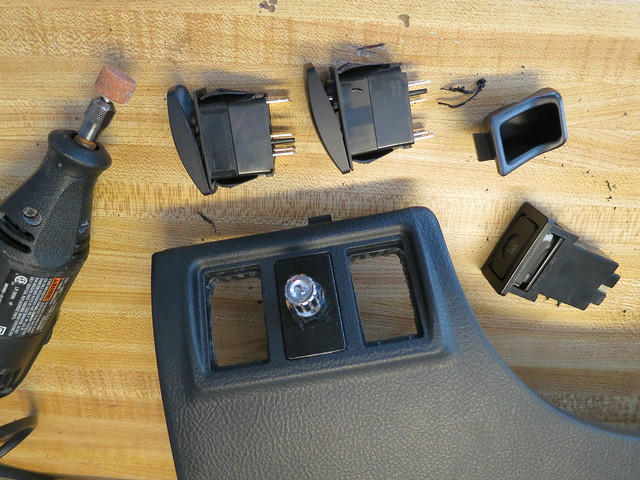 Switch Installation Preparation by gold94corolla, on Flickr
The two switches installed snug and perfectly! Their finish matches the OEM black perfectly, it's amazing. And the rocker action of these is solid, makes me want to click them all day lol.
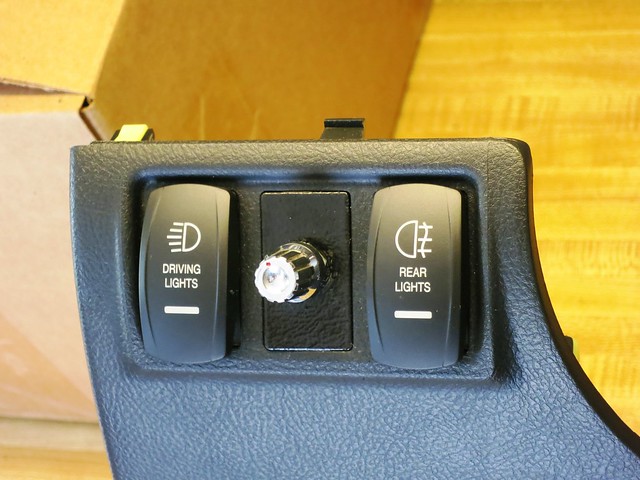 Installed Switches by gold94corolla, on Flickr
The center switch is a rotary that controls the brightness of the low beam HIDs. It was going to be replaced later.
The way I've got it wired, both front and back lights recieve power as soon as the key is turned, independant of any other function. This power comes from the ACC feed to the radio. Each switch is grounded to light up the blue LEDs inside. The wiring is kinda messy, but it works.
 Switch Wiring by gold94corolla, on Flickr
And that's done! It really was easy to do and it looks amazing. Will look even better when I install the matching switch in the middle!
 Switches Installed by gold94corolla, on Flickr
So when the key is turned, the upper blue LEDs turn on (switches are off)
 Switches Lit by gold94corolla, on Flickr
When the switches are flipped on, the bottom blue LED turns on
 Switches On by gold94corolla, on Flickr
Very cool.
 Switches Off by gold94corolla, on Flickr
 Switches Lit Up by gold94corolla, on Flickr
 Switches On by gold94corolla, on Flickr
OK NOOOOOOW we're ready for some final pics!
Flip the rear switch on, and the LED strips light up. They aren't insanely bright like I had originally wanted, but they are just right for bad weather, and I can still use them at night if inclined.
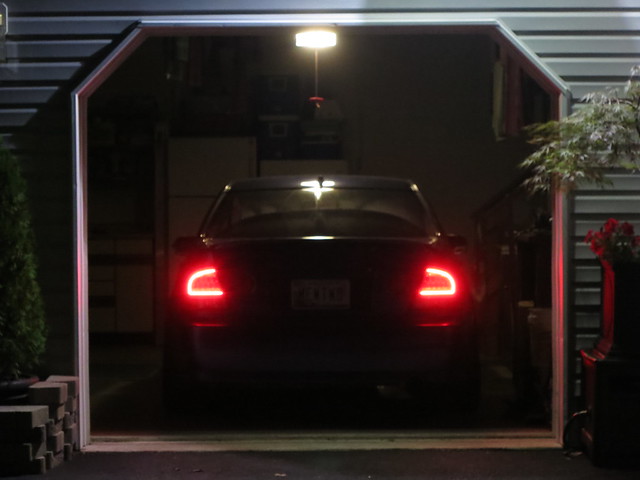 DRL Lights by gold94corolla, on Flickr
Here's now it looks with the strips and parking (dim) lights on. The outer strip lights give the overall appearance a very stock and definied shape in the tail light.
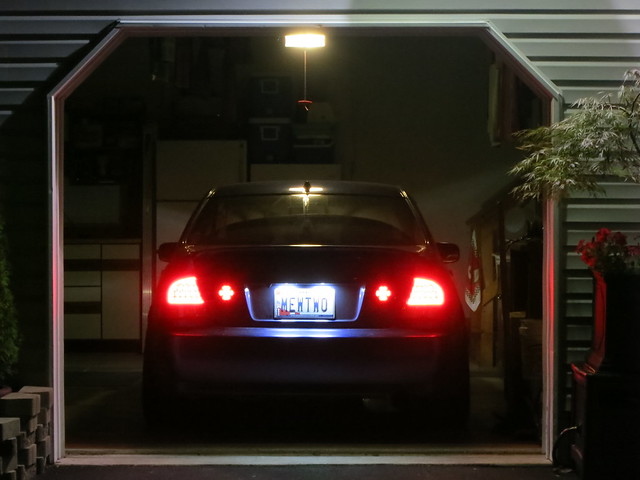 Running & DRL Lights by gold94corolla, on Flickr
With the strips off, it looks like this. Finally, all of the LEDs, both outer and trunk, are perfectly matched! No more embarassing hot spots.
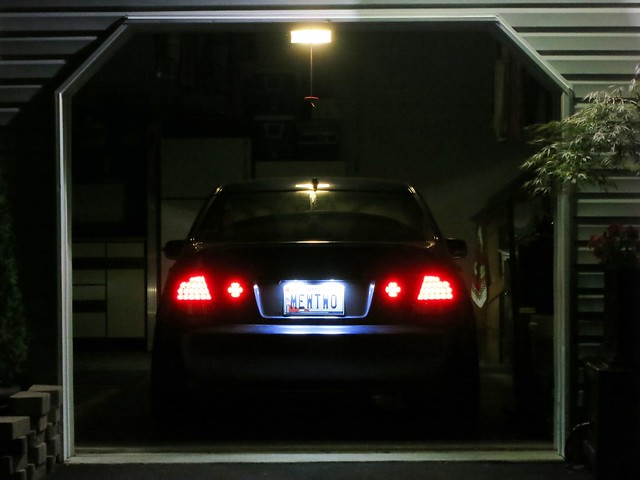 Running Lights by gold94corolla, on Flickr
Originally, I wanted to add an LED to fix that deadspot, but it wasn't possible. So, that's what the strips are for, to give the shape a perfect, stock edge.
Here are the brake lights.... again, everything is evenly bright! In fact, the outer lights are now a little brighter than the inner trunk lights, which makes sense more than the other way around like it used to be lol.
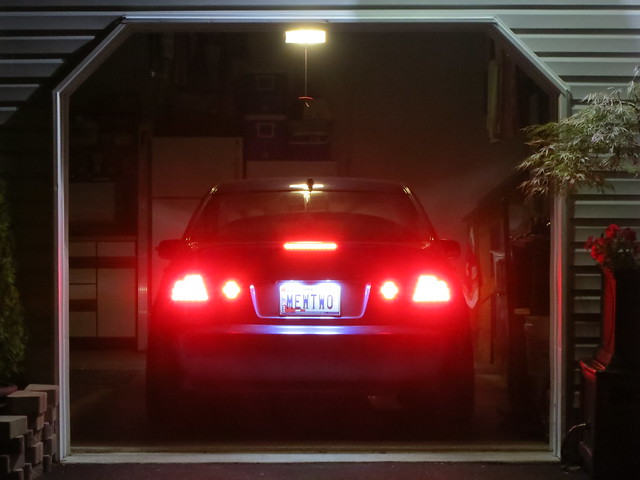 Brake Lights by gold94corolla, on Flickr
And so it's done! Finally, after so many years, and really not much to show for it. But I'm super happy 100% with the outcome, and I can rest assured knowing that it will never fail on me.
Some installed pics. The black primer finish matches the tires perfectly!
 IMG_6566-2 by gold94corolla, on Flickr
 IMG_6570-2 by gold94corolla, on Flickr
Note that the head lights are stock in these pics, and the lip kit is under construction. It's gonna be sick when it's all back together, and the head lights match! But I'm really loving the darker look in the tails now, without looking black or tinted. It looks awesome in person.
 IMG_6567-2 by gold94corolla, on Flickr
 IMG_6568-2 by gold94corolla, on Flickr
 IMG_6569-2 by gold94corolla, on Flickr
 IMG_6571-2 by gold94corolla, on Flickr
 IMG_6572-2 by gold94corolla, on Flickr
 IMG_6573-2 by gold94corolla, on Flickr
And the best thing is that I didn't even have to do anything to the trunk lights, they were already dark around the edges, and the LEDs in those were already proper.
More pics.
 LED Tails Lit by gold94corolla, on Flickr
 LED Tails Close by gold94corolla, on Flickr
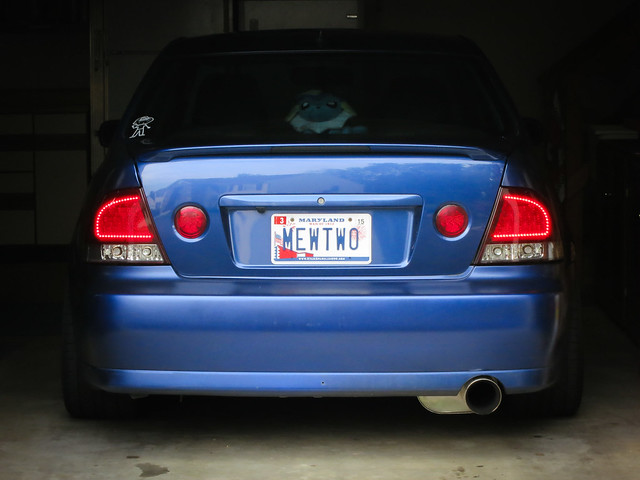 Rear DRL On by gold94corolla, on Flickr
Full LED
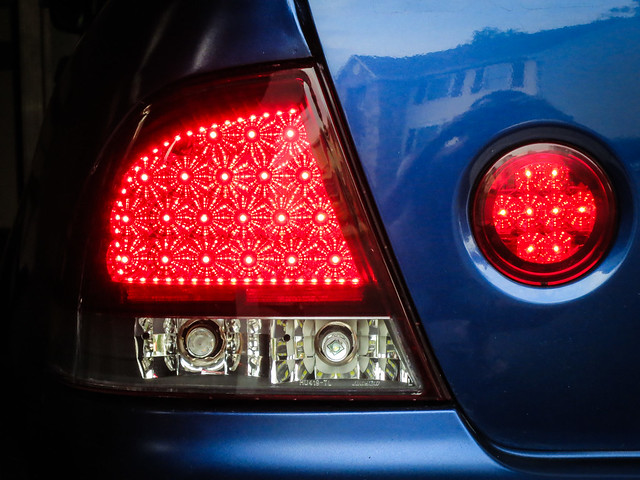 LEDs On Close by gold94corolla, on Flickr
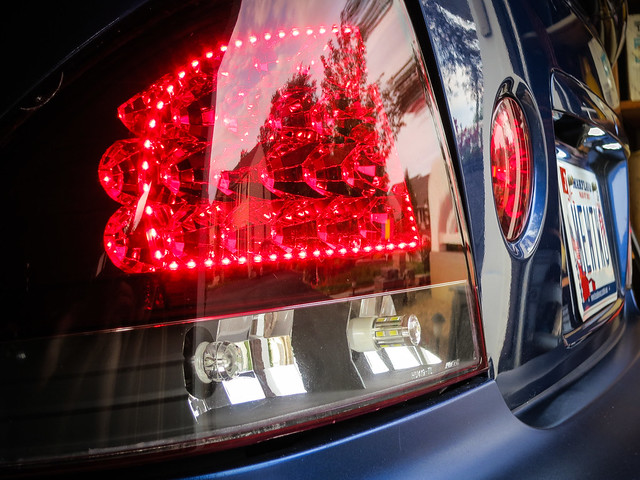 LEDs On Side by gold94corolla, on Flickr
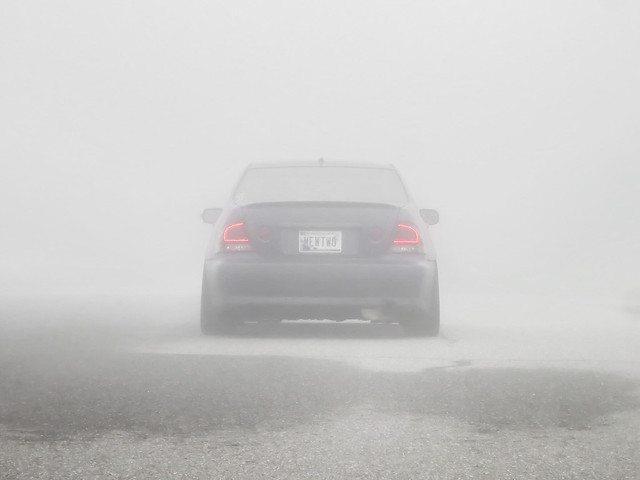 Foggy Rear by gold94corolla, on Flickr
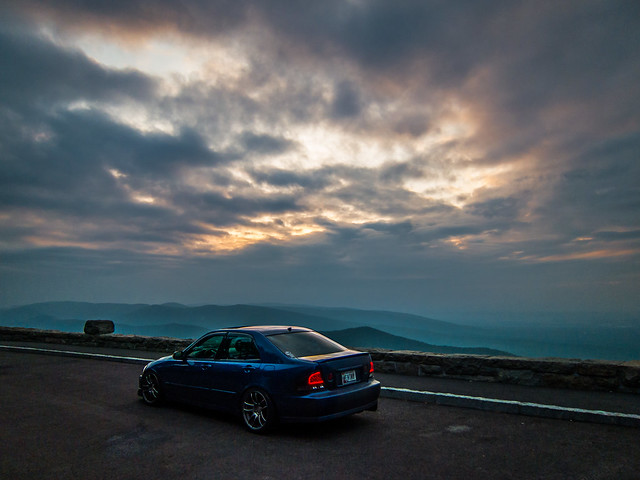 Blue Ridge Parkway Sunset by gold94corolla, on Flickr
 New LED Tail Lights by gold94corolla, on Flickr
After I installed them (no issues with fitment), I fired them up, only to notice that the LEDs inside were all very unevenly lit. The inner columns are brighter than the outer columns, and the right tail light was noticeably brighter than the other.
 LEDs Aren't Evenly Bright by gold94corolla, on Flickr
After I installed the matching trunk LEDs, I noticed how dim the outer tail lights were in brake-mode. They're OK brightness, but definitely not up to my brightness standards. I'm pretty anal about my lights, so they have to match lol. Plus, it can't hurt to have brighter brake lights.... the brighter the better!
 LED Tails Brake Lights by gold94corolla, on Flickr
So, I knew that opening the tails to customize them and fix these problems was inevitable (especially in "light" of my history of lighting addiction). I thought it would be cool to change how they lit up, to something maybe more unique and modern. Here's a photoshop I did on this car with the same tail lights (the brake lights were all on, so I blacked out all 5 tail lights to just this):
 LED Tail Light Concept by gold94corolla, on Flickr
My idea was to create a bright LED strip in that shape^^^^ to function in addition to the other LEDs inside. This extra strip would be a kind of rear fog light, or rear DRL... something brighter than the parking lights that I could use when needed. Maybe the extra strip light could also be programmed to function as the parking light as well, in a dimmer mode, instead of having ALL the LEDs on (so it would look like that ^^^^ at night also).
My original intention was to rip out the LED reflectors completely and build my own LED board, maybe with some kind of optics or diffuser to hide the LEDs and help distinguish the outer LED strip from the inner LED brake lights.
Over a couple of years, I kept thinking about how I would be able to achieve this. I even picked up some acrylic sheets locally to experiment with diffusion techniques. I later abandoned the idea of removing all of the reflectors, because I really liked how they looked in there, all shiny and reflective and stuff.
Then, I read about some new flexible LED light tubes that could possibly work. By now, I'm sure you've seen people install the switchback (yellow + white) version of these inside of head lights.
exLED 1 Color or 2 Color LED Bar Ver2
I ordered a few feet of those in red-red (two red strips inside, not 2 different colors). They eventually arrived from Korea, in some of the most overkill packaging EVER lol (the box itself was wrapped inside of all that bubble wrap you see behind it):
 exLED Strip Box by gold94corolla, on Flickr
All of that ^^^^ for this:
 exLED Strip Materials by gold94corolla, on Flickr
The red LED strips have side-firing LEDs, and are flexible in one direction. They were really bright when I first fired them up:
 exLED Strip LEDs Lit by gold94corolla, on Flickr
But then, as soon as I put them into the conduit tubing, the light was drastically reduced, and spread the light output in all directions (including backwards), cutting down on the forward intensity too much.
 exLED Strip Comparison by gold94corolla, on Flickr
In this pic, it LOOKS like the strips are bright, telling by all of the red "glare" around the strips, but that's not actually glare like 2 pics up, it's actually just light coming out of the side and bottom of the tubes. So they were very dim inside the tubes.
 exLED Strip Final by gold94corolla, on Flickr
Some closeups of the LED strips and tube:
 exLED Side by gold94corolla, on Flickr
 exLED Length by gold94corolla, on Flickr
 exLED Top by gold94corolla, on Flickr
 exLED Tube CrossSection by gold94corolla, on Flickr
(a lot of time elapses)
I took the tail lights off the car finally for other reasons, and decided to just start the project.
The stock tail lights are plastic-welded shut, but these had glue holding on the lens. I hoped it was regular glue that could soften by heating, but alas, it was permaseal. Nevertheless, I was somehow able to get the lenses off with the lucky combination of time and temperature in the oven. The LED section itself then removes with 3 screws on the back. I cut off the sockets for later, and removed the red reflector rectangles. I ended up chipping a part off of each lens, so technically I ruined them and failed. I ordered a new set of tails lol.
 Tail Lights Opened by gold94corolla, on Flickr
Next, I taped up the individual reflectors (for the LEDs, turn signal, and reverse lights) and sprayed them with my trusty Rustoleum flat black automotive primer (same paint as the head lights). I use this color because it's a very light black, almost gray, and it is a perfect match for carbon fiber and tires (all my blacks gotta match lol).
 Tail Lights Painted by gold94corolla, on Flickr
Tape removed.... came out perfect
 Tape Removed by gold94corolla, on Flickr
Here's a comparison showing the effect of the paint after the replacement set of tail lights came in. The paint doesn't really do that much, but just darkens the tails just enough to have a unique look, not chrome anymore, but not black, either.
 Tail Light Comparison 1 by gold94corolla, on Flickr
In the shade, the difference becomes obvious. (note that the red reflector rectangles are not installed back in the black tails yet)
 Tail Light Comparison 2 by gold94corolla, on Flickr
I figured that I knew what I was doing, and that to remove the tail light lenses without chipping, they needed more temperature and/or time in the oven. Well........... I was wrong. As soon as I removed them, and they started to cool, the lenses warped badly, completely ruining them.
So I was instantly ready to give up, since there was no way I was going to risk ruining a set of these beautiful tail lights. I took out my frustration in the only logical way.
 Tail Light Project Aborted by gold94corolla, on Flickr
I went back and ordered a 3rd set of tails, and that was going to be that. But I quickly realized that I might be able to repair the lenses, so I superglued the chipped parts back on. It worked perfectly on one tail light, but I screwed up on the other, making the seam look cloudy white. Since it was in the red section, I couldn't have that, so I ordered a can of red lens paint from VHT. I figured I could just paint over the entire red section and it would look good again. (note, I never did repaint it lol, figured I'd just make it worse). Fortunately, I was able to cancel the order of tail lights, the seller was very nice.
So after letting the project sit for a little bit, I was doing other work on the car. I was learning how to wetsand and do machine polishing while learning how to get OEM paint finish with spray cans and clear coat. I decided to have a go at the tail light lenses with the polisher machine. The difference was instantly noticeable:
 Right Lens Buffed by gold94corolla, on Flickr
 Top Lens Buffed by gold94corolla, on Flickr
Looked new again!! So, inspired by that, I went back to work on the tails.
I played around with the LED strips in order to determine how to install them and get the look I wanted. Played around for hours and days lol.
I ultimately came up with this simple setup (simple was the goal here, didn't need it breaking or something later).
In the pic below, the green circles are little holes I drilled to feed in the LED strips. The two holes on the left side are where the strips enter (the wires go out there), and the one hole in the bottom on the right is where the other end sticks in, just to hold it in place.
The red square shows how I had to put heat-shrink wrap around the last 2 LEDs on the strip in order to hide them from view when they lit up. You see, these strips light up in segments of 3 consecutive LEDs, and I needed exactly 1 LED in this last segment in order to complete the line. So, I left the other 2 LEDs on out of necessity, but it ended up to my advantage, because that gave the strip some extra length to go through the hole and hold itself in place. The black heat-shrink wrap would blend in with the black paint and disappear.
 LED Strip Installation by gold94corolla, on Flickr
Next was to glue the strips in place. You can see the product I used in the pic: RTV ultra black gasket maker. It takes 24 hours to cure, so I put the clips on to hold it for that long.
The bottom strip was pretty straightforward to glue in, but actually, in order for it to end up at that bottom hole I drilled, I had to file down each edge of the chrome LED reflectors behind it. The bottom LED strip cannot flex backwards, so it had to remain straight along there. Filing down the reflectors under the strip meant that it could sit flat and straight, perfectly.
The upper LED strip just happened to naturally follow the perfect shape I needed. You can see how it touches at the top, then rounds towards the bottom, then sticks through that hole, and touches the bottom of the black painted reflector area.
Oh, and another thing.... it took me a while of playing around to figure out how to get the LEDs to appear seemless from one strip to the other. I had to pay special attention to where I glued in the bottom strip. If I glued it too close or too far, the first LED on the bottom strip would appear out of place compared to the last LED on the upper strip.
 LEDs Glued In Place by gold94corolla, on Flickr
24 hours later, I removed the clips. Everything was perfectly glued in place! I couldn't help but fire up the strips to see how it would look. Notice that, as I just mentioned, the LED spacing appears consistent all the way around, even where the 2 strips come together. Also notice how it would have not looked right if the upper strip had one less LED, instead of covering up the last 2 to get that extra 1. Both tail lights look identical to each other!
 LED Strips From Front by gold94corolla, on Flickr
 LED Strips From Far by gold94corolla, on Flickr
The side angle here shows..... well, a side angle. You can see how the LED strips kinda float in front of the reflectors as they curve down.
 LED Strips From Side by gold94corolla, on Flickr
And from the top.... it took a lot of time getting the strips to match perfectly in both tail lights.
 LED Strips From Top by gold94corolla, on Flickr
And the cool thing is that you really can't see the strips in there, even though they sort of cover the outer reflectors. And the bottom strip is glued right on the edge between chrome and black paint. So they blend in very nicely.
 Just LEDs by gold94corolla, on Flickr
Again. I've obviously put the lower red reflector rectangles back in (that will help brighten up that area so it doesn't look so black in the final product).
 Tail Lights Without Lens by gold94corolla, on Flickr
Annnnnnnd with the lenses back on. You can see how the lower reflectors help fill the dark space down there (which I didn't like when I first painted the lights)
 Final Tail Light Look by gold94corolla, on Flickr
I couldn't help myself... just had to see how the strips would look
 LED Strips Inside Lens by gold94corolla, on Flickr
This next pic shows the brake lights on with the old inner LEDs, a pretty good match for the strips. The strip LEDs are actually redder than the old brake lights. Also, the strip helps fill in that one dead area on the top left where there is no brake LED.
 Strips + Old Brake LEDs by gold94corolla, on Flickr
Next was to redo the LEDs inside of the reflectors. I needed 20 LEDs per side. I ended up buying 1200 lol.
 LumiLEDs For Sale by gold94corolla, on Flickr
Those are the ideal LEDs for OEM setups, and what I've always used in my builds. You can see the specs on the label if you view the fullsize pic (4000x3000) on Flickr.
It was really easy to remove the old LEDs with some small screws.
 LED Boards Unscrewed by gold94corolla, on Flickr
Again, viewing these pics in full size will bring out the details, if you're interested.
The old LED boards were set up so that there were 2 LEDs and one resistor in each little circuit on the inner 4 columns, and 3 LEDs + 1 resistor on the outer 2 columns. I never was able to figure out why they were all different brightnesses, but I have a feeling this difference has something to do with it.
Also, the tail lights combined brake (bright) and parking (dim) functions together with the same LEDs using a simple resistor and 2 diodes on each + input. You can see the resistor where the green wire connects to the board.
I was gonna change ALL of that.... because it sucked. So, bye bye old components!!
 Old Components Removed by gold94corolla, on Flickr
My first change was that I was going to have FOUR LEDs + 1 resistor per circuit. Since there are 20 LEDs, that would make 5 little circuits, instead of NINE before. Since each circuit uses the same amount of power, fewer circuits means less power consumption.
Here's why:
If you have 12 volts, and each LED takes 2.6 volts, then you need a resistor to make up the difference in volts. So, if you have 2 LEDs, the resistor needs to consume 6.8 volts. But with using 4 LEDs per circuit, the resistor only needs to consume 1.6 volts. Resistors are just converting power into heat... a complete waste. So you can see how my proposed setup will save power.
I know that ^^^ is way over simplified and not entirely correct, but stop thinking so hard and trust me!
um where was I
Oh yeah, the new boards. So I soldered on 20 new LEDs and reconfigured the boards so that I could have 4 LEDs per circuit instead of 2.
 Replaced LEDs Rear by gold94corolla, on Flickr
You can see that I had to add some jumper wires to convert the boards as needed. The resistors are installed as well, though not as many as before. View the big picture and figure it out if you really care lol. (note that the boards have built-in traces or wires, so I utilized those as well, and had to break some connections)
From the front, it doesn't look any different than before, but now the LEDs are much better quality and designed to run properly!!
 Replaced LEDs Front by gold94corolla, on Flickr
Note that I've put the connector plug back on directly to the board, and the green wire is not connected. That's because I was going to change the wiring on the tail light harnesses in the car itself, and BOTH parking and brake feeds were going to come through the red wire into these 20 LEDs, rather than combining on the board with resistors and diodes. More on that later. I did this so that I'd have the green wire freed up for the LED strips.
Here's a quick comparison showing how the new LEDs on the right are a lot brighter (and redder!) than the old ones on the left.
 Old LEDs Vs New by gold94corolla, on Flickr
Hmmm, seems like I'm missing a picture here of the LED boards installed back into the reflectors and with the LED strips wired into the harness. Oh well, you have an imagination.
With the LED part all finished and functioning properly, it was time to reseal the lights!
You can see the glue I used: Clear RTV silicone. Again, a 24 hour cure time, so I used tape to hold the lenses tightly in.
 Tail Lights Glued by gold94corolla, on Flickr
I removed the tape a couple of days later... FINALLY FINISHED!!! Oh, and I spray painted the black bolt area gloss black again, since I forgot to mask it off when painting it with black primer.
 Completed LED Tail Lights by gold94corolla, on Flickr
Well I wasn't really finished, was I. I said earlier that I was going to re-wire the car to combine the brake and parking light together into one wire.
Here's what I used. Instead of doing the simply diode+resistor thing, I used a pulse wave modulator (PWM). I happened to have 2, but I only needed one. Each of these can handle 2 amps of current, but my tails use only 0.7 amps COMBINED. That's 8.4 watts for both sides, vs 42 watts with 2 OEM bulbs.
ANYWAYS, here's the boards. You can see it has 4 wires on the bottom. They are marked (thank goodness). B = Brake input, M = Marker input, - = ground, and O = Output to the tail lights. You can see the 2 large diodes on the board... just like the two diodes that used to be inside the tail lights with the LEDs. The blue knob thing on that top controls the brightess of the output in marker mode. I had to set it as dim as it would go to match the marker brightness on the trunk lights perfectly. I did install a heat sink on the voltage regulator (the black thing in the center with 4 pins) later. The little white LED there just shows what the output looks like.
After this thing is wired up, it will light up the output dim by flickering really fast at full power. There is no resistor. The LEDs are always full brightness, but depending on how it flickers, it looks brighter or dimmer. You can Google PWM if you're interested in more. And when the brake light input is triggered, it stops flickering and you get it looking full brightness again. Pretty neat, and it's the proper way of dimming LEDs. Maybe you've seen other OEM cars with LED tails at night, and you'll maybe be able to see the super fast flickering. Well, that's what this is. The voltage regulator is there to limit the voltage to the LEDs to 12 volts. Without this, the LEDs can see ANY voltage that is sent their way, usually up to 14. Having no regulation (like before my project), LEDs fail.
 PWM Detail by gold94corolla, on Flickr
Again, you can Google all of this stuff because I'm the worst at explaining these things. And if I could learn how to do this, so can you.
In the car, I was pretty lucky with the stock wiring. 1) it was easy to access, right where you'd think it would be, and 2), it was just tail light wires inside of the looms, nothing else. So, that meant that I could work with both sides in one spot where they came together.
I opened up the looms and found the parking light and brake light wires. Cut them. The brake input wires and parking input wires went to the PWM board, and then the PWM output went to the tail lights. Those are all with yellow wire nuts. The orange wire nut is a new red wire I ran from the front of the car for the LED strips, and so that red wire connects to the green wire in the tail lights. Oh, and the ground wire goes to that bolt there. You can see the white LED lit up to show it works, and you can see that I've installed a heat sink on the voltage regulator.
 PWM Installed by gold94corolla, on Flickr
After stocking up the wiring and tucking the PWM away:
 stocked Finished Wiring by gold94corolla, on Flickr
BTW, the carpet covers all of the wiring, so there wasn't a point in taking a pic of the final wiring job.
Tail lights simply plug in, just like before, but now they function properly! Of course, I won't be able to use stock tail lights or regular bulbs unless I simply undo that wiring (that's the benefit to using wire nuts, it's temporary)
Thought you were getting final installed pics? NOPE!! STILLLLLLLLLLLL not finished yet! One more thing to do: power the strip LEDs.
Originally, I was thinking of using an OEM rear fog light switch installed in the blanks area. But then I found this place with a whole ton of custom rocker switches:
OTRATTW
My original front DRL switch had fried anyway, so I went ahead and ordered two rockers, one for the front and one for the back.
When the switches arrived, I tried fitting them in the OEM blank spots. They didn't quite fit, so I had to widen the holes in the dash (there was extra plastic there for some reason), and I had to trim the bottom of the switch slightly. You can see that all, plus the old junk, in this pic.
 Switch Installation Preparation by gold94corolla, on Flickr
The two switches installed snug and perfectly! Their finish matches the OEM black perfectly, it's amazing. And the rocker action of these is solid, makes me want to click them all day lol.
 Installed Switches by gold94corolla, on Flickr
The center switch is a rotary that controls the brightness of the low beam HIDs. It was going to be replaced later.
The way I've got it wired, both front and back lights recieve power as soon as the key is turned, independant of any other function. This power comes from the ACC feed to the radio. Each switch is grounded to light up the blue LEDs inside. The wiring is kinda messy, but it works.
 Switch Wiring by gold94corolla, on Flickr
And that's done! It really was easy to do and it looks amazing. Will look even better when I install the matching switch in the middle!
 Switches Installed by gold94corolla, on Flickr
So when the key is turned, the upper blue LEDs turn on (switches are off)
 Switches Lit by gold94corolla, on Flickr
When the switches are flipped on, the bottom blue LED turns on
 Switches On by gold94corolla, on Flickr
Very cool.
 Switches Off by gold94corolla, on Flickr
 Switches Lit Up by gold94corolla, on Flickr
 Switches On by gold94corolla, on Flickr
OK NOOOOOOW we're ready for some final pics!
Flip the rear switch on, and the LED strips light up. They aren't insanely bright like I had originally wanted, but they are just right for bad weather, and I can still use them at night if inclined.
 DRL Lights by gold94corolla, on Flickr
Here's now it looks with the strips and parking (dim) lights on. The outer strip lights give the overall appearance a very stock and definied shape in the tail light.
 Running & DRL Lights by gold94corolla, on Flickr
With the strips off, it looks like this. Finally, all of the LEDs, both outer and trunk, are perfectly matched! No more embarassing hot spots.
 Running Lights by gold94corolla, on Flickr
Originally, I wanted to add an LED to fix that deadspot, but it wasn't possible. So, that's what the strips are for, to give the shape a perfect, stock edge.
Here are the brake lights.... again, everything is evenly bright! In fact, the outer lights are now a little brighter than the inner trunk lights, which makes sense more than the other way around like it used to be lol.
 Brake Lights by gold94corolla, on Flickr
And so it's done! Finally, after so many years, and really not much to show for it. But I'm super happy 100% with the outcome, and I can rest assured knowing that it will never fail on me.
Some installed pics. The black primer finish matches the tires perfectly!
 IMG_6566-2 by gold94corolla, on Flickr
 IMG_6570-2 by gold94corolla, on Flickr
Note that the head lights are stock in these pics, and the lip kit is under construction. It's gonna be sick when it's all back together, and the head lights match! But I'm really loving the darker look in the tails now, without looking black or tinted. It looks awesome in person.
 IMG_6567-2 by gold94corolla, on Flickr
 IMG_6568-2 by gold94corolla, on Flickr
 IMG_6569-2 by gold94corolla, on Flickr
 IMG_6571-2 by gold94corolla, on Flickr
 IMG_6572-2 by gold94corolla, on Flickr
 IMG_6573-2 by gold94corolla, on Flickr
And the best thing is that I didn't even have to do anything to the trunk lights, they were already dark around the edges, and the LEDs in those were already proper.
More pics.
 LED Tails Lit by gold94corolla, on Flickr
 LED Tails Close by gold94corolla, on Flickr
 Rear DRL On by gold94corolla, on Flickr
Full LED
 LEDs On Close by gold94corolla, on Flickr
 LEDs On Side by gold94corolla, on Flickr
 Foggy Rear by gold94corolla, on Flickr
 Blue Ridge Parkway Sunset by gold94corolla, on Flickr

 Aww man, at least you tried. What are you planning to try next?
